How to record computer audio
On Windows, record the PC’s own sound with Audacity’s free WASAPI loopback or by turning on Stereo Mix; on Windows 11, Snipping Tool’s PC audio button (Windows + Shift + R) records it with a video. On a Mac with macOS 27 or later, press Command + Shift + 5 and choose Include System Audio; on a Chromebook, choose Device audio in Screen capture.
Step by step
Windows has no single built-in way to record only what the PC plays, so the dependable route is Audacity, a free open-source audio editor. Its WASAPI loopback listens to the output of your speakers or headphones directly, which works even on PCs where Stereo Mix is missing. These steps are for Audacity 3.4 or later on Windows 10 or 11.
Open Audacity’s Audio Setup
Install Audacity from audacityteam.org and open it. Select Audio Setup on the toolbar, then Audio Settings; the same window is under Edit › Preferences › Audio Settings.
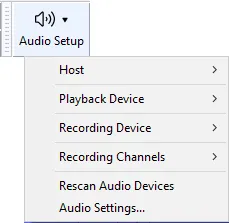
1 Host. 2 Recording Device. 3 Audio Settings, where both can be set in one window. Audacity on Windows.Image: Audacity Manual, CC BY 3.0 Checked 24 October 2026 against manual.audacityteam.org
Choose Windows WASAPI and the loopback device
Set Host to Windows WASAPI. Under Recording, open Device and choose the speakers or headphones you are listening on with (loopback) after the name, then set Channels to 2 (Stereo). If you change the playback device later, choose its loopback again.
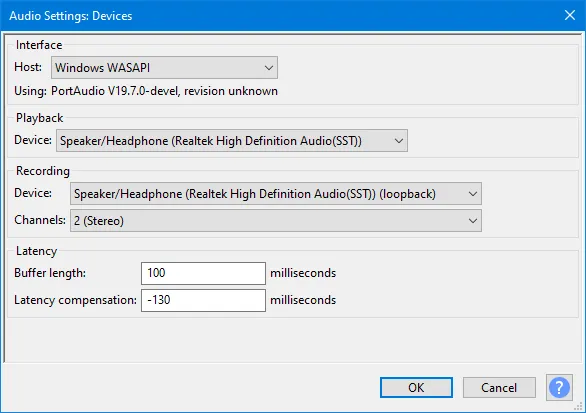
1 Host: Windows WASAPI. 2 Recording device: the speakers you listen on, marked (loopback). 3 2 (Stereo) channels. Audacity on Windows.Image: Audacity Manual, CC BY 3.0 Checked 24 October 2026 against manual.audacityteam.org
Start the sound, then select Record
Turn off Transport › Transport Options › Enable audible input monitoring, or you hear everything twice. Start the video, call or music first, then select the red Record button. Loopback writes nothing while the PC is silent and picks up again when sound returns, so a gap at the start is normal.
Checked 24 October 2026 against manual.audacityteam.org
Stop and export the file
Select Stop, play the take back, then choose File › Export Audio and pick MP3 or WAV. Audacity keeps an unsaved project until you export or save it, so export before you close the window.
Checked 24 October 2026 against manual.audacityteam.org
What each computer records on its own
The question that decides everything is whether you need the sound alone or the sound with a picture of the screen. Most built-in tools only do one of the two. Here is what comes with each system, before you install anything:
- Windows 11: Snipping Tool 11.2307 or later records PC audio and the microphone, always as a video. Sound Recorder makes audio files, from a microphone. Stereo Mix, where the sound driver offers it, turns the PC’s output into an input any recorder can use.
- Windows 10: no built-in way to record the screen with PC sound except Xbox Game Bar, one app at a time. Stereo Mix and Voice Recorder work as on Windows 11.
- macOS 27 or later: the Screenshot toolbar records the screen with Include System Audio. macOS 26 or earlier: no built-in way at all; the Mac’s own sound needs another app.
- ChromeOS: Screen capture records Device audio with a video; there is no audio-only mode.
- Any browser recorder: Chrome and Edge can share a tab’s sound everywhere, and the whole computer’s sound on Windows, ChromeOS and recent Macs.
Turn on Stereo Mix in Windows
Stereo Mix is a recording device that carries whatever the PC plays. It comes from the sound card’s driver, usually Realtek, not from Windows, so many laptops and most USB or Bluetooth headsets do not have it. When it is there, it is often hidden and disabled.
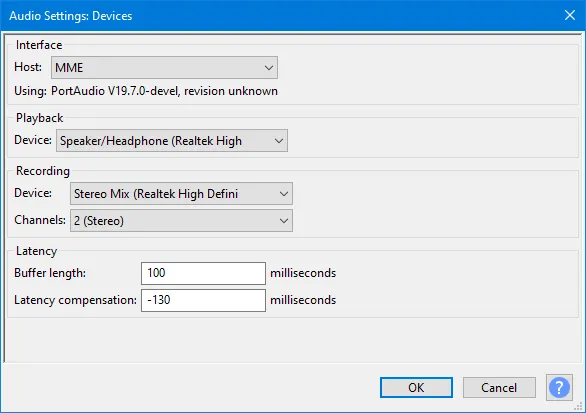
On Windows 11 open Settings › System › Sound › More sound settings; on Windows 10 right-click the speaker icon by the clock and choose Sounds. Open the Recording tab, right-click an empty part of the list and tick Show Disabled Devices. If Stereo Mix appears, right-click it and choose Enable. Any recorder can now pick it as its input, including Audacity on the ordinary MME host.
Stereo Mix only hears the device it belongs to. If your sound goes out through HDMI, a USB headset or Bluetooth, play it through the built-in speakers while you record, or use Audacity’s loopback above, which follows whichever output you choose.
Voice recording on a PC with Sound Recorder
Shortcut: Control + R
For your own voice, Windows already has what you need. Open Sound Recorder from Start (Voice Recorder on Windows 10), press Ctrl + R or the record button, and press Esc to stop. Space pauses without starting a new file. Each recording can run for up to three hours, and the files live inside the app, so deleting the app deletes them.
Microsoft describes Sound Recorder entirely in terms of the microphone: permission, input level and the Microphone Array device. It has no switch for the PC’s own sound. If you want both, record your voice there and the computer in Audacity, or use one tool that takes both, such as Snipping Tool or a browser recorder.
Record PC audio with a video in Snipping Tool
Shortcut: Windows + Shift + R
When you need the screen as well as the sound on Windows 11, Snipping Tool is already installed. Press Windows + Shift + R, drag over the area, then check the two sound buttons on the bar before Start: the microphone, and PC audio, the speaker on a screen. A button is on when it is not crossed out.
The result is always an MP4 video. To keep only the sound, open it in Audacity with its free FFmpeg library installed, which lets it import the sound from a video, and export that. The Windows 11 guide covers the rest of the recorder, and the Windows 11 audio article each sound setting in more depth.

Record desktop audio with OBS Studio
OBS Studio is free, runs on Windows, Mac and Linux, and always records a video file. On Windows it adds a Desktop Audio source by default, which takes the output device set under Settings › Audio. If its meter in the Audio Mixer moves while sound plays, it is being recorded.
To record one program instead of everything, add an Application Audio Capture source with the + button and pick the app’s window. That needs OBS Studio 28 or later on Windows 10 version 2004 or later, or Windows 11. OBS suggests turning off the global Desktop Audio in Settings › Audio when you do, so the same sound is not recorded twice.
Record internal audio on a Mac
Shortcut: Command + Shift + 5
Apple added system audio to the Screenshot toolbar in macOS 27 Golden Gate. Press Command + Shift + 5, open Options and choose Include System Audio, with or without a microphone. It records a video; QuickTime Player’s own recorder still takes a microphone only.
On macOS 13 Ventura to macOS 26, OBS Studio 30 or later has a macOS Audio Capture source that takes the whole Mac’s sound or one app’s, and asks for the Screen & System Audio Recording permission the first time. Before Ventura, a virtual audio device such as BlackHole is the usual route. The Mac computer audio guide compares them, the Mac screen recording guide shows the toolbar step by step, and how to screen record on Mac with audio adds your voice to the same recording.
Record a Chromebook’s sound
Press Ctrl + Shift + Show windows, select the gear and choose Device audio, or Device audio and microphone for a narrated recording. Screen capture saves it as a WebM video in Downloads, and a GIF never carries sound. The Chromebook guide has every step, including what to do when Device audio is missing from the menu.
Tab audio or system audio: what a browser can take
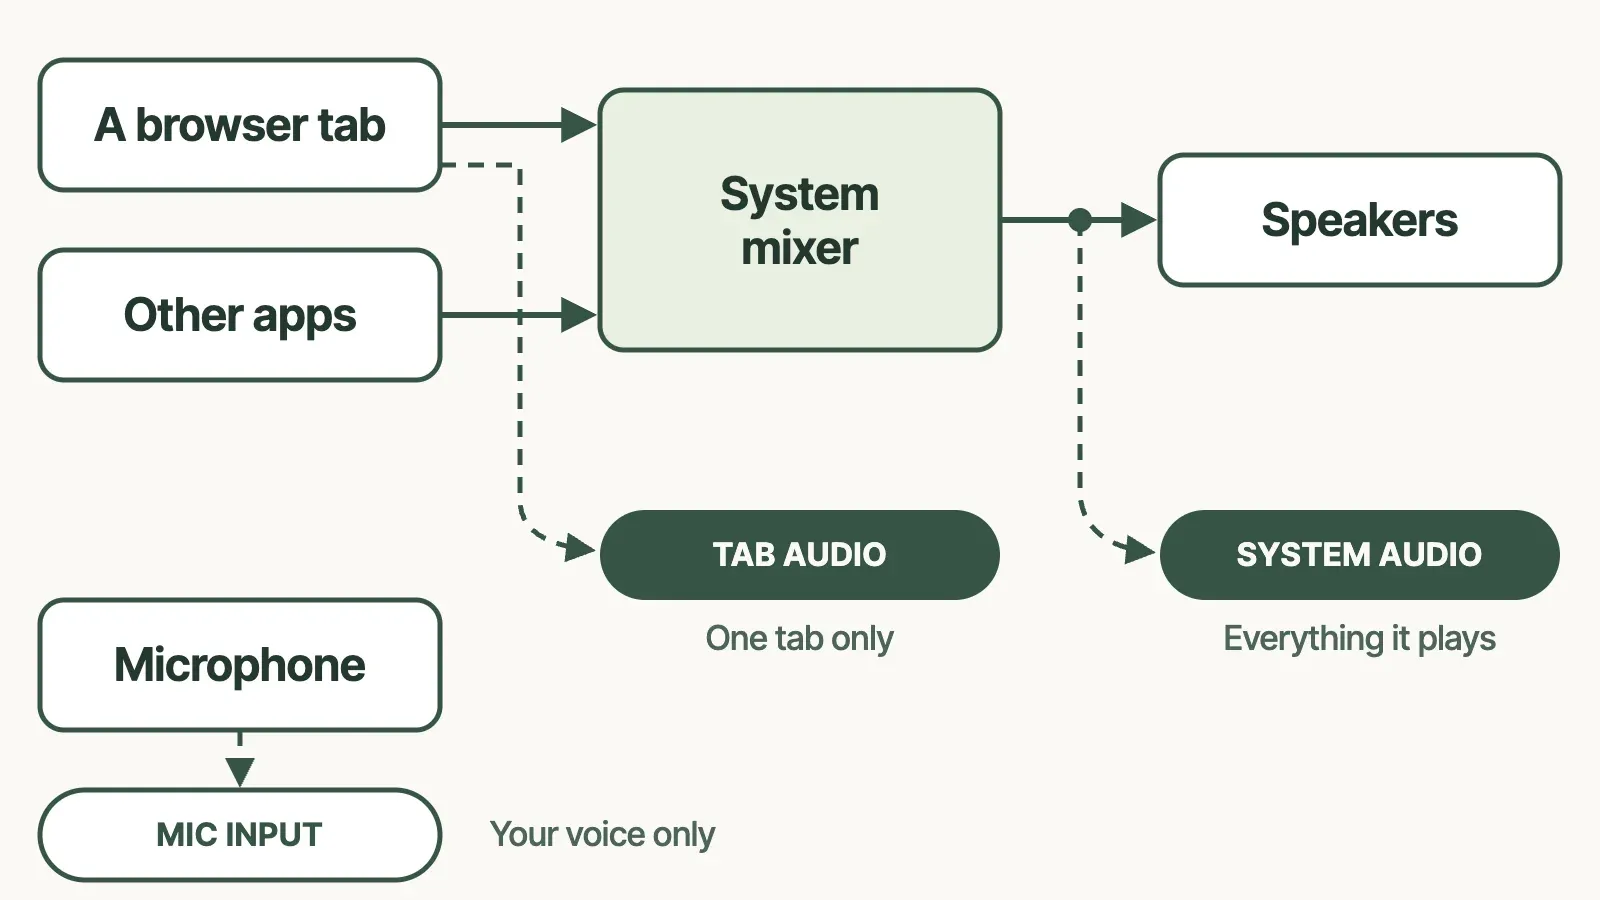
A browser recorder asks you what to share, and the sound follows from that choice. Tab audio is only what one tab plays, picked up inside the browser before it reaches the rest of the computer, so a message notification or music in another app stays out. System audio is the operating system’s whole mix, the same thing Stereo Mix and loopback hear.
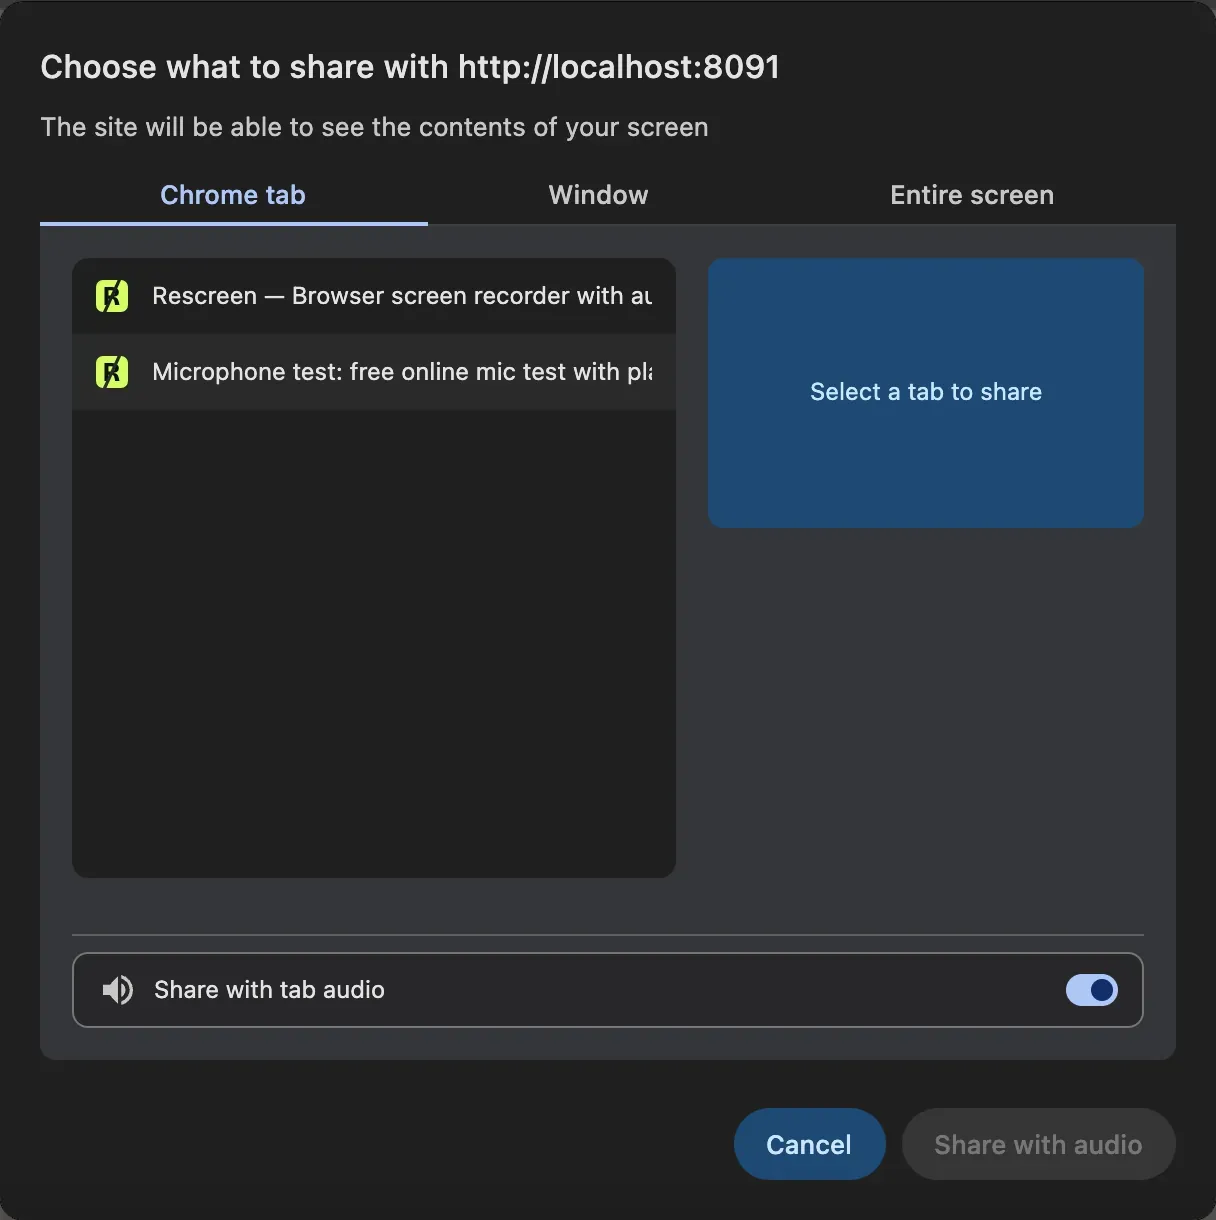
In Chrome or Edge, share a tab with Share with tab audio on for a video or a call in the browser. Share the entire screen with Share with system audio on for a desktop app; that works on Windows and ChromeOS, and on a Mac with Chrome 141 or later and macOS Sonoma 14.2 or later. Firefox and Safari share no computer sound. The Chrome guide shows every pane of the picker.
Record the sound with your screen in Rescreen
If the sound belongs to something on screen, a demo, a bug, a lesson with a video in it, record both together. Rescreen runs in Chrome or Edge with nothing to install and records your screen, the shared sound, your microphone and your camera in one take. It is not an audio-only recorder: you get a video with a link to share.
Choose the sound in the picker as above: a tab with tab audio, or the entire screen with system audio. A shared window brings no computer sound on Windows. When you stop, Rescreen removes long pauses and false starts, which you can put back in the editor. Check your voice first with the microphone test, and shrink a long take for email with the video compressor.
Before you record a call, a stream or music
Recording a film, a song or a paid course for your own notes may still break the service’s terms, and sharing it is usually copyright infringement. Many streaming apps block capture outright and record as silence or a black box.
Calls are different: in many places the law requires every person on the call to agree before you record, and some workplaces forbid it whatever the law says. Ask at the start, on the recording, and keep the file only as long as you need it.
Windows, Mac and ChromeOS tools or Rescreen
| Windows, Mac and ChromeOS tools | Rescreen | |
|---|---|---|
| Audio | PC audio in Snipping Tool 11.2307+; system audio on macOS 27+; device audio on ChromeOS. | Your microphone, plus the sound of a browser tab, or of the whole computer where your browser offers it. |
| Webcam | Only on a Chromebook. | Your camera in a round bubble over the screen, or the camera on its own. |
| Editing | None; trim or cut in another app. | Done when you stop recording: cuts mistakes, retakes, filler words and silences, zooms into what you do, reduces noise and levels your voice, speeds up still screens. |
| Length | Sound Recorder: three hours per file. Others: free disk space. | Up to five hours per recording, on the free plan. |
| Sharing | A file you send yourself. | A link anyone can watch without an account. |
| File format | MP4, MOV or WebM video; M4A in Sound Recorder. | MP4 download in 4K, 2K or HD on Pro. |
| Cost | Free, comes with the system. | Free. Pro is $10 / month billed $120 yearly, or $20 monthly. |
What Windows, Mac and ChromeOS tools can't do
- No Windows tool records only the PC’s sound without setup: Stereo Mix depends on the sound driver, and loopback needs Audacity or a similar app.
- Stereo Mix hears one output device; sound going to HDMI, USB or Bluetooth is missed.
- Snipping Tool, the Mac toolbar and Chromebook Screen capture always make a video, never an audio file on its own.
- Macs before macOS 27 have no built-in way to record system audio.
- Protected streams record as silence or black, in every tool.
If it doesn't work
Stereo Mix is not in the Recording tab
Right-click the list and tick Show Disabled Devices and Show Disconnected Devices. If it still does not appear, your sound driver does not offer it; use Audacity with Windows WASAPI and the (loopback) device instead, which needs no driver support.
OBS Studio is not recording desktop audio
Check that the Desktop Audio meter moves in the Audio Mixer and is not muted, then open Settings › Audio and set Desktop Audio to the device you are actually listening on. After plugging in a headset, choose it there again; Default may not follow the change.
The recording is silent or stops and starts
Loopback only records while something plays, so start the sound before Record. If it is silent throughout, the loopback or Stereo Mix device belongs to a different output than the one you hear; pick the matching one.
Everything plays twice, with an echo
Monitoring is on. In Audacity turn off Transport › Transport Options › Enable audible input monitoring; in OBS set the source’s monitoring to off in Edit › Advanced Audio Properties.
A Mac recording has my voice but not the computer
Before macOS 27 the Screenshot toolbar records a microphone only. Update if the Mac supports it, or use OBS Studio 30’s macOS Audio Capture, or share a browser tab with tab audio.
Questions people ask
Can you record PC audio?
Yes. Windows 11’s Snipping Tool records PC audio with a video, and Audacity’s free WASAPI loopback records the sound alone on Windows 10 and 11.
Why isn’t OBS Studio recording desktop audio?
Usually because Desktop Audio points at a different output than the one you hear, or it is muted in the Audio Mixer. Set it under Settings › Audio and watch its meter move.
How do I record internal audio on a Mac?
On macOS 27 or later, press Command + Shift + 5, open Options and choose Include System Audio. On earlier versions use OBS Studio 30’s macOS Audio Capture or a virtual device such as BlackHole.
How do I do a voice recording on a PC?
Open Sound Recorder from Start and press Ctrl + R to start and Esc to stop. It records your microphone, up to three hours per file.
Can you voice record on your computer?
Yes, every system has a microphone recorder: Sound Recorder on Windows, Voice Memos on a Mac, and Screen capture with Microphone on a Chromebook, which saves a video.
How can I record internal audio on my computer?
Record the system mix, not the microphone: WASAPI loopback or Stereo Mix on Windows, Include System Audio on macOS 27, Device audio on a Chromebook, or system audio in a browser’s share picker.