How to screen record on a Chromebook
Press Ctrl + Shift + Show windows, choose Screen record in the bar at the bottom, pick full screen, a window or part of the screen, and click to start. To finish, select the red stop button at the bottom right or press Search + Shift + X; the video is saved to your Downloads folder as a WebM file.
Step by step
Every Chromebook has a screen recorder built in, called Screen capture. There is nothing to install and no account to set up, and it works the same on a school, work or personal Chromebook unless an administrator has turned it off.
Open Screen capture
Press Ctrl + Shift + Show windows. The Show windows key is in the top row and looks like a box with two lines beside it. On an external keyboard without that key, press Ctrl + Shift + F5. If your Chromebook has a Screenshot key, that opens the same tool. Without the keyboard, select the time at the bottom right and then Screen capture.
Shortcut: Control + Shift + Show windows
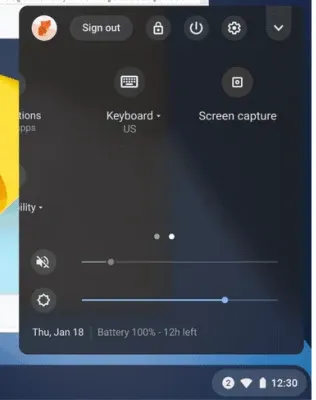
1 Screen capture in Quick Settings, opened from the time at the bottom right. From March 2021; newer versions of ChromeOS arrange the buttons differently.Image: Google Checked 23 October 2026 against support.google.com
Switch to video
The capture bar opens at the bottom of the screen with two buttons on its left: a camera for screenshots and a video camera for recordings. Select Screen record, the video camera.
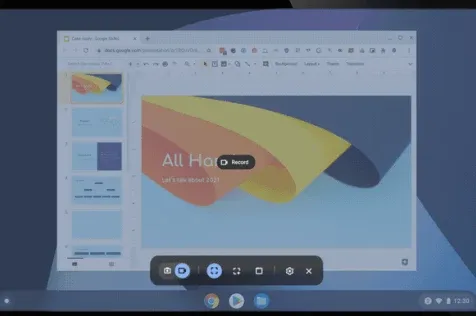
1 Screen record, the video camera. 2 What to record: the full screen, part of it, or one window. 3 Settings, for sound and camera. From March 2021.Image: Google Checked 23 October 2026 against support.google.com
Choose sound and camera in Settings
Select the gear, Settings, on the capture bar. Under audio, pick Microphone, Device audio or Device audio and microphone. Turn on Front camera to put your face in a small window on the recording, and Show clicks and keys if you are teaching shortcuts.
Checked 23 October 2026 against support.google.com
Pick what to record
Choose full screen, partial or window in the middle of the bar. For full screen, click anywhere to start. For a window, click the window. For part of the screen, drag a box, then choose Record video.
Checked 23 October 2026 against support.google.com
Stop and find the file
Select the red Stop recording button at the bottom right of the shelf, or press Search + Shift + X. The video is saved straight away; find it in the Files app under Downloads.
Shortcut: Search + Shift + X
Checked 23 October 2026 against support.google.com
Record a Chromebook with audio: microphone and device sound
To record your voice, choose Microphone in Screen capture settings before you start. To record the sound the Chromebook itself plays, a video, a game, a call, choose Device audio. For a narrated tutorial over a video with sound, choose Device audio and microphone.
Two things catch people out. A recording made as a GIF has no sound at all, whatever the setting says, so choose Record video rather than Record GIF when you drag out part of the screen. And if your settings menu shows only a microphone switch, with no Device audio choice, the Chromebook is on an older version of ChromeOS: open Settings › About ChromeOS › Check for updates, restart, and look again.
Before a recording that matters, make ten seconds of test footage and play it back with headphones. It is quicker than redoing a ten-minute take with a muted microphone. The microphone test shows whether the browser can hear you at all.
Record audio only on a Chromebook
Screen capture always makes a video; it has no sound-only mode. For a voice memo, record a video of a still window with Microphone on. The picture costs little space when nothing moves, and the sound is all that matters.
If what you need is a lecture or a tutorial with narration, record it as a video anyway: the voice is easier to follow with the screen beside it, and a viewer can always listen without watching.
Show your camera while recording
Turn on Front camera in Screen capture settings and your camera appears in a small window on the screen, recorded into the video with everything else. Check where it sits before you start, so it does not cover what you are showing.
The camera preview only appears in video recordings, not GIFs. If the switch is missing, check that no other app is using the camera, and try the webcam test to see whether Chrome can open it.
Where Chromebook screen recordings are saved
Recordings go to the Downloads folder by default as WebM video files. Open the Files app and select Downloads, or Recent to see the newest first.
To save somewhere else, such as a Google Drive folder that syncs to your other devices, open Screen capture, select Settings, then Select folder. Every new capture goes there. On a school Chromebook the folder may be fixed by the administrator, which is why the choice sometimes cannot be changed.
WebM plays in Chrome and on YouTube, but some editors and phones will not open it. The WebM to MP4 converter turns a recording into an MP4 in the browser, the WebM to MP3 converter keeps just the sound of a lecture or meeting, the WebM to GIF converter makes a short clip into a looping GIF, and the video compressor makes a long one small enough to attach to an email or an assignment.
School Chromebook: Screen capture is missing or turned off
On a Chromebook managed by a school or an employer, the administrator decides whether screen capture is allowed. In Google’s admin settings the Screenshot policy controls whether users can take screenshots on ChromeOS devices, by any means, including the keyboard shortcut. When it is off, the shortcut and the Screen capture button do nothing, and there is no setting on the Chromebook itself that turns it back on.
The administrator can also choose where captures are saved, and whether websites may ask to share the screen at all. That second setting is why a web recorder can be blocked on some school Chromebooks while working on others.
If you need to record for an assignment and capture is blocked, ask your teacher or the school’s IT help desk. They can allow it for your class, or tell you which recorder the school has approved.
Record and edit in the browser with Rescreen
The built-in recorder makes a file and stops there. If the recording is going to someone else, a teacher, a client or a team, Rescreen runs in Chrome on the Chromebook with nothing to install, and gives you a link to send instead of a large WebM file.
Open the recorder, choose your microphone and camera, and pick what to share in Chrome’s own picker: the entire screen, a window or a tab. To include the Chromebook’s sound, share the entire screen and turn on Share with system audio, or share a tab and keep Share with tab audio on. A shared window carries no sound in Chrome.
When you stop, Rescreen cuts mistakes, retakes, filler words and long silences, and zooms into what you do. Your camera sits in a round bubble over the screen. Change any of it in the editor, then copy the link; viewers watch it without an account. On a school Chromebook where sites may not share the screen, Rescreen is blocked too, for the same reason as above.
ChromeOS Screen capture or Rescreen
| ChromeOS Screen capture | Rescreen | |
|---|---|---|
| Audio | Microphone, device sound, or both. None in a GIF. | Your microphone, plus the sound of a browser tab, or of the whole computer where your browser offers it. |
| Webcam | Front camera in a small window on the recording. | Your camera in a round bubble over the screen, or the camera on its own. |
| Editing | None. Trim or cut in another app. | Done when you stop recording: cuts mistakes, retakes, filler words and silences, zooms into what you do, reduces noise and levels your voice, speeds up still screens. |
| Length | No limit stated by Google; bounded by free storage. | Up to five hours per recording, on the free plan. |
| Sharing | A file in Downloads or the folder you chose. | A link anyone can watch without an account. |
| File format | WebM video, or GIF for part of the screen. | MP4 download in 4K, 2K or HD on Pro. |
| Cost | Free, built into ChromeOS. | Free. Pro is $10 / month billed $120 yearly, or $20 monthly. |
What ChromeOS Screen capture can't do
- Video is saved as WebM only. There is no MP4 option; convert it afterwards if you need one.
- GIF recordings carry no sound and no camera.
- There is no editing beyond the recording itself: no trimming, cutting or captions in Screen capture.
- Recordings are files on the Chromebook. To share one you upload or attach it yourself.
- A school or work administrator can turn screen capture off entirely.
If it doesn't work
The shortcut does nothing, or Screen capture is missing from Quick Settings
On a school or work Chromebook, an administrator has most likely turned screen capture off; ask them. On your own Chromebook, restart it and check for updates in Settings › About ChromeOS, then try Ctrl + Shift + F5 if you use an external keyboard.
The recording has no sound
Open Screen capture, select Settings and choose Microphone or Device audio before you start; the default can be off. Make sure you chose Record video and not Record GIF, which never has sound. If the microphone still records nothing, check Settings › Device › Audio for the right input.
I pressed Ctrl + Alt + Z and the Chromebook started talking
That shortcut turns on ChromeVox, the built-in screen reader. Press Ctrl + Alt + Z again to turn it off. It is close to the screen capture keys, so it is easy to hit by mistake.
I cannot find the recording
Open the Files app and look in Downloads, or Recent. If it is not there, open Screen capture › Settings to see which folder was chosen; a school may send captures to Google Drive.
The file will not open on a phone or in my editor
Chromebook recordings are WebM files. Convert the recording to MP4 and it opens almost anywhere.
Questions people ask
How do I record my screen on a Chromebook?
Press Ctrl + Shift + Show windows, select Screen record, choose full screen, a window or part of the screen, and click to start. Stop it with the red button at the bottom right of the shelf.
How do I stop a screen recording with audio on a Chromebook?
Select the red Stop recording button at the bottom right of the screen, or press Search + Shift + X. Recordings with sound stop the same way as silent ones, and the video saves to Downloads.
What does Ctrl + Alt + Z do on a Chromebook?
It turns ChromeVox, the Chromebook’s screen reader, on or off. If your Chromebook starts reading the screen aloud, press Ctrl + Alt + Z again.
How do I take a screenshot on a Chromebook?
Press Ctrl + Show windows for a picture of the whole screen, or Ctrl + Shift + Show windows and choose Screenshot to capture part of the screen or one window. Screenshots save to Downloads as PNG files.
Why won’t my Chromebook take a screenshot?
On a school or work Chromebook, the administrator has probably turned screenshots off, and only they can turn it back on. On your own Chromebook, restart it and update ChromeOS, and use Ctrl + Shift + F5 if your keyboard has no Show windows key.
How do I record the screen on any computer?
Every major system has a built-in recorder: Screen capture on a Chromebook, the Snipping Tool on Windows 11, and Command + Shift + 5 on a Mac. A browser recorder such as Rescreen works the same way on all of them.